Within the Appmiral framework, there are 2 ways of adding a map to your app.
- Static map image (only for our BASIC price-tier)
- Interactive map (as part of the ADVANCED or PRO price-tiers)
1. Static map (BASIC price-tier)
Adding this kind of map can easily be done via our CMS.
🚨 Best to upload a .jpg with a high resolution with min. size of 1.500px by 1.500px
You can forward the static map directly to your Customer Success Manager.
2. Interactive map assets
For the interactive or dynamic map, our design team will need to take over the exact position of your festival/event location and all relevant Places Of Intrest (POI). This has to be done in a 'geo-accurately' way because our maps will be activated as an interactive layer on top of an Apple or Google map.
- ASSET 1: AutoCAD
- ASSET 2: Static Map
- ASSET 3: Any additional info of interest
🔜 Please provide us a .zip/Dropbox/WeTransfer that includes the requested assets below by mail to your Customer Success Manager.
ASSET 1: AutoCad of the actual festival grounds (in pdf)
This is the most important document for us to draw the maps.
Make sure that all the different points on the map (POI) are clear for us to read and their polygon gives us the exact size for us to take over (ex. bar = small; stage is big)
If possible add the names to each POI (ex. Cocktail Bar, Mainstage, French Fries). These names can be adjusted later on from the CMS as well but will help us both to deliver a good map faster.
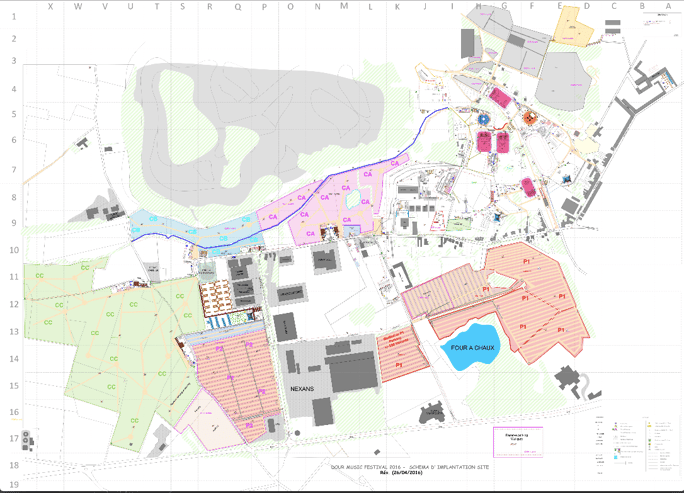
Example 1 Implantation of the map in the environment is important for the accuracy of our map. For perfect geo-referencing, we need at least 3 clear points of reference added to the map: mostly fixed buildings and road intersections.
.png?width=684&name=unnamed%20(1).png)
Example 2 Size, shape and color really matter. A defined color scheme (eg. red = food, blue = drinks, …) makes it obvious for us to assign categories. The size of the bars and stages is important to make the map realistic and accurate while your visitors are navigating through the crowd.
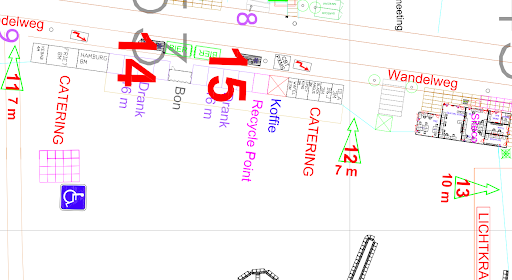
Example 3 It's easiest for both of us that the names of the POI are written next to each booth/POI. Although all names can be adjusted from the CMS, the more that is correct, the less work you'll have.
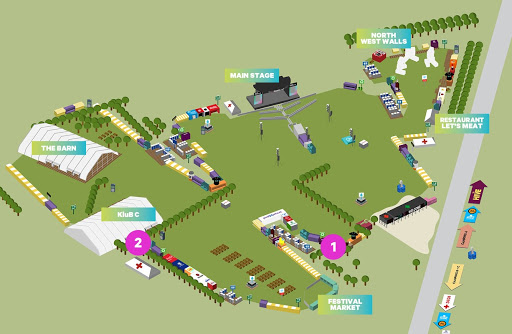
ASSET 2: Static Map (mostly) used for printing
This kind of map helps us locate POIs faster and understand your location faster and better.
ASSET 3: Additional context or relevant information
Inform us of POIs that should not become part of the map in the mobile application:
- include parking?
- include camping grounds?
- VIP?
- emergency exits, wheelchair access, ...
Below you can find the full list of possible POI categories that will be available by default from your CMS. Make sure to inform us if you are missing any categories, we need to add these before submitting the apps to the stores!
-
- Food
- Drinks
- Activities
- Partner
- Stages
- Camping grounds
- Emergency exits
- Water fountains
- First Aid
- Toilets
- Parking
- Shelter
- Check-in
- Showers
- Charging station
- Wheelchair access
- VIP
- Info point
- Entrance
- Festival ground (make sure this is properly drawn on the Autocad)
- Walkway
- Vouchers
- Wristbands
- Bike Parking
- Lost & found
- Ticketing
- ADA Parking
- ATM
- Kiss & Ride
- Merchandise
- Recycle points
- Security / Bag check
- Wifi zone